|
|
| (15 dazwischenliegende Versionen von 2 Benutzern werden nicht angezeigt) |
| Zeile 8: |
Zeile 8: |
| | == '''Installation of a timer "Vivaldi myTimer" in the Vivaldi incl. WLAN / WiFi''' == | | == '''Installation of a timer "Vivaldi myTimer" in the Vivaldi incl. WLAN / WiFi''' == |
| | | | |
| − | In addition to the installation of further options will be described.
| + | Aditionally the installation of further options will be described. |
| | | | |
| | The following options are installed independent of the timer. | | The following options are installed independent of the timer. |
| − | But it is mostly so little additional effort, so it is advisable to implement this with, when the machine is open times. | + | But it is mostly so little additional effort, so it is advisable to implement this, when the machine is opened. |
| | | | |
| − | '''Option 1''': Switching automatic load / automatic reference | + | '''Option 1''': Switching automatic load / manual draft |
| | | | |
| − | '''option 2''': energy Meter | + | '''option 2''': energy meter |
| | | | |
| − | '''Option 3''': Shot Timer incl shot administration | + | '''Option 3''': Shot timer incl. shot administration |
| | | | |
| | '''Option 4''': automatic backflush | | '''Option 4''': automatic backflush |
| | | | |
| − | '''Option 5''': boiler shutdown (not in mini-Vivaldi) | + | '''Option 5''': boiler shutdown (not in mini Vivaldi) |
| | | | |
| − | == ''' project ''' ==
| |
| | | | |
| − | By installing a single-board computer (Raspberry Pi) into the Vivaldi is realized with a clock timer with unlimited switching.
| + | == '''Project description''' == |
| | | | |
| − | As an additional feature the Vivaldi is wireless capability and can be switched off via PC / tablet and smartphone and. In addition, the timer can be programmed web-based. By means of a relay is simulated by the Raspberry only the time you press the power button. The material costs are about 65,- US$. | + | By installing a single-board computer (Raspberry Pi) into the Vivaldi a week clock timer with unlimited switching times will be realized.<br \> |
| | + | As an additional feature the Vivaldi will get a wireless lan and can be switched on and off via PC/tablet and smartphone. In addition, the timer can be programmed web-based. By usage of relays keypresses to the power putton will be simulated by the Raspberry. <br \> |
| | + | The material costs are about 65,- US$. |
| | + | |
| | + | [[Datei:Vivaldi 2.JPG]] |
| | | | |
| | == '''Functions''' == | | == '''Functions''' == |
| | | | |
| − | * Programming the (mini) Vivaldi a Webinterfache | + | * Programming the (mini) Vivaldi wia web interfache |
| − | * Unlimited number of timers to activate / deactivate the machine (daily, weekly, individually (de-) activated) (with / without Boiler in the non-mini) | + | * Unlimited amount of timers to switch on/off the machine (daily, weekly, individually switchable) (with/without steam boiler in the non-mini) |
| − | * Switching on / off via web interface with popular browsers (eg with a smartphone of The Move) | + | * Switching on/off via web interface with popular browsers (eg with a smartphone when you are out) |
| − | * The non-Mini can be switched on with / without boiler via the GUI optional | + | * The non-Mini can be switched on with without steam boiler via the GUI optional |
| − | * Power on / off by building control via Web Interface | + | * Power on / off by building control via web Interface |
| | * Automatic and manual shot Timer | | * Automatic and manual shot Timer |
| − | * Shot administration (database with comment and favorites function) (Shots under 8 seconds are not saved) | + | * Shot administration (database with comment and favorites function) (Shots under 8 seconds will not be saved) |
| − | * The shot database can be adjusted by pressing a button (all uncommented entries without Favourite Flag and without touch) | + | * The shot database can be cleaned by pressing a single button (all uncommented entries without favourite flag and without mark) |
| − | * per shift timing programmable boiler shutdown (Not for mini Vivaldi) | + | * all timers can be programmed individually with/without switching steam boiler shutdown (Not for mini Vivaldi) |
| − | * automatic load detection can be switched off (manual reference) | + | * automatic shot can be switched off (manual draft) |
| − | * backflush | + | * backflush automatic |
| − | * electricity meter incl. electricity cost calculator | + | * electric meter incl. electric cost calculator |
| − | * User management with authorisation concept | + | * user management with authorisation concept |
| | * configuration completely possible through the graphical interface | | * configuration completely possible through the graphical interface |
| | * phpMyAdmin can be used for data migration | | * phpMyAdmin can be used for data migration |
| | * configuration of WLAN on Windows directly to the SD card possible | | * configuration of WLAN on Windows directly to the SD card possible |
| − | * interface for home automatisation
| |
| | * integrated printserver with airprint | | * integrated printserver with airprint |
| | | | |
| − | == Screenshots ==
| |
| | | | |
| − | The surface is available from the PC / tablet or smartphone WIA browser.</span> <span class="notranslate" onmouseover="_tipon(this)" onmouseout="_tipoff()"><span class="google-src-text" style="direction: ltr; text-align: left">Der Timer inkl. manuelle Ein-/Ausschaltung und Umschaltung der Dosierung [[Datei:VivaldiMyTimer_Timer.png]] Shottimer/Shotverwaltung [[Datei:VivaldiMyTimer_Shot.png]] Userverwaltung [[Datei:VivaldiMyTimer_Rights.png]] Konfiguration [[Datei:VivaldiMyTimer_Settings.png]] == Sicherheitshinweis == Die hier beschriebenen Arbeiten dürfen nur durch fachkundige Personen durchgeführt werden.</span> The timer includes manual on / off and change the dosage. [[File: VivaldiMyTimer_Timer.png]] shot timer / shot administrative [[File: VivaldiMyTimer_Shot.png]] User management [[File: VivaldiMyTimer_Rights.png]] configuration [[File: VivaldiMyTimer_Settings .png]] == == Security Note The tasks described here may only be carried out by competent persons.</span> <span class="notranslate" onmouseover="_tipon(this)" onmouseout="_tipoff()"><span class="google-src-text" style="direction: ltr; text-align: left">Bei Arbeiten an 230V besteht Lebensgefahr.</span> When working on 230V can be fatal.</span> <span class="notranslate" onmouseover="_tipon(this)" onmouseout="_tipoff()"><span class="google-src-text" style="direction: ltr; text-align: left">Außerdem kann bei Fehlern die Maschine beschädigt werden.</span> Moreover, in case of errors the machine may be damaged.</span> <span class="notranslate" onmouseover="_tipon(this)" onmouseout="_tipoff()"><span class="google-src-text" style="direction: ltr; text-align: left">== Disclaimer == Diese Beschreibung schildert den Umbau meiner Maschine.</span> == Disclaimer == This description portrays the rebuilding my machine.</span> <span class="notranslate" onmouseover="_tipon(this)" onmouseout="_tipoff()"><span class="google-src-text" style="direction: ltr; text-align: left">Es ist nicht sichergestellt, daß sich Fehler eingeschlichen haben.</span> There is no guarantee that errors have crept.</span> <span class="notranslate" onmouseover="_tipon(this)" onmouseout="_tipoff()"><span class="google-src-text" style="direction: ltr; text-align: left">Aus diesem Grund sollte nicht 1 zu 1 alles übernommen werden.</span> For this reason, should not be taken 1 to 1 all.</span> <span class="notranslate" onmouseover="_tipon(this)" onmouseout="_tipoff()"><span class="google-src-text" style="direction: ltr; text-align: left">Es dient vielmehr dazu die Arbeiten nachvollziehen zu können und eine eigenen Umbau ohne diese Beschreibung zu tätigen.</span> It is intended primarily to be able to understand the work and to pay an own conversion without this description.</span> <span class="notranslate" onmouseover="_tipon(this)" onmouseout="_tipoff()"><span class="google-src-text" style="direction: ltr; text-align: left">Ich hafte nicht für eventuelle Schäden!</span> I am not responsible for any damage!</span> <span class="notranslate" onmouseover="_tipon(this)" onmouseout="_tipoff()"><span class="google-src-text" style="direction: ltr; text-align: left">Diese Beschreibung ist ein initialer Entwurf.</span> This description is an initial draft.</span> <span class="notranslate" onmouseover="_tipon(this)" onmouseout="_tipoff()"><span class="google-src-text" style="direction: ltr; text-align: left">Es würde mich freuen, wenn jemand die Beschreibung auf Korrektheit prüfen würde.</span> It would be glad if someone would check the description is correct.</span> <span class="notranslate" onmouseover="_tipon(this)" onmouseout="_tipoff()"><span class="google-src-text" style="direction: ltr; text-align: left">Verbesserungsvorschläge, Korrekturen und ergänzende Bilder sind gerne gesehen.</span> Suggestions, corrections and additional photos are welcome.</span> <span class="notranslate" onmouseover="_tipon(this)" onmouseout="_tipoff()"><span class="google-src-text" style="direction: ltr; text-align: left">== Das Material == Der Raspberry PI (Rev. 2), ein Gehäuse, eine 4GB SD-Karte, ein WLAN-Stick, ein Netzteil und eine Verlängerung um in der Vivaldi eine Steckdose für das Netzteil zu schaffen.</span> == == The material to create the Raspberry PI (Rev. 2), a housing, a 4GB SD card, a WLAN stick, an AC adapter and an extension to the Vivaldi a socket for the power adapter.</span> <span class="notranslate" onmouseover="_tipon(this)" onmouseout="_tipoff()"><span class="google-src-text" style="direction: ltr; text-align: left">Wer den Raspberry extern anbaut, kann auch mit einer normalen Steckdose arbeiten.</span> Who grows the Raspberry externally, can also operate with a standard electrical outlet.</span> <span class="notranslate" onmouseover="_tipon(this)" onmouseout="_tipoff()"><span class="google-src-text" style="direction: ltr; text-align: left">Hinweis: Der Raspberry PI (Rev. 2) ist nicht 100% kompatibel zur Rev. 1. Auf Grund des veränderten Steckleiste läuft die bereitgestellte Software nicht korrekt.</span> Note: The Raspberry PI (Rev. 2) is not 100% compatible with the Rev. 1. Due to the modified connector strip is not running the software provided correct.</span> <span class="notranslate" onmouseover="_tipon(this)" onmouseout="_tipoff()"><span class="google-src-text" style="direction: ltr; text-align: left">Der Raspberry PI B+ ist pinkompatibel und kann deshalb genutzt werden.</span> The Raspberry PI B + is pin-compatible and can therefore be used.</span> <span class="notranslate" onmouseover="_tipon(this)" onmouseout="_tipoff()"><span class="google-src-text" style="direction: ltr; text-align: left">[[Datei: VivaldiMyTimer_Raspberry.png]] Die Kabel und ein Relais.</span> [[File: VivaldiMyTimer_Raspberry.png]] The cable and a relay.</span> <span class="notranslate" onmouseover="_tipon(this)" onmouseout="_tipoff()"><span class="google-src-text" style="direction: ltr; text-align: left">[[Datei: VivaldiMyTimer_Kabel.png]] Die Bauteile gibt es größtenteils bei Reichelt: [http://www.reichelt.de/?ACTION=20;AWKID=963127;PROVID=2084 Hier der Warenkorb] Dann benötigen wir noch die Relaisplatine mit einem oder zwei Relais.</span> [[File: VivaldiMyTimer_Kabel.png]] The components there are largely Reichelt: [http://www.reichelt.de/?ACTION=20;AWKID=963127;PROVID=2084 Here the cart] Then we still need the relay board with one or two relays.</span> <span class="notranslate" onmouseover="_tipon(this)" onmouseout="_tipoff()"><span class="google-src-text" style="direction: ltr; text-align: left">Hier hilft bei ebay die Suche nach „Relais Raspberry“.</span> Here helps ebay search for "relays Raspberry".</span> <span class="notranslate" onmouseover="_tipon(this)" onmouseout="_tipoff()"><span class="google-src-text" style="direction: ltr; text-align: left">Schraubklemmen auf beiden Seiten vermeiden Lötarbeiten.</span> Screw on both sides avoid soldering.</span> <span class="notranslate" onmouseover="_tipon(this)" onmouseout="_tipoff()"><span class="google-src-text" style="direction: ltr; text-align: left">Für die Option 2 wird ein Stromzähler benötigt.</span> For option 2, a current meter is required.</span> <span class="notranslate" onmouseover="_tipon(this)" onmouseout="_tipoff()"><span class="google-src-text" style="direction: ltr; text-align: left">Dazu hilft bei ebay folgende Suche weiter: „Stromzähler S0“.</span> These helps ebay following search continues, "electricity meter S0".</span> <span class="notranslate" onmouseover="_tipon(this)" onmouseout="_tipoff()"><span class="google-src-text" style="direction: ltr; text-align: left">Es gibt Modelle mit unterschiedlichen Impulsen pro kW.</span> There are models with different pulses per kW.</span> <span class="notranslate" onmouseover="_tipon(this)" onmouseout="_tipoff()"><span class="google-src-text" style="direction: ltr; text-align: left">Je höher der Wert, umso genauer ist der Zähler.</span> The higher the value, the more accurate the count.</span> <span class="notranslate" onmouseover="_tipon(this)" onmouseout="_tipoff()"><span class="google-src-text" style="direction: ltr; text-align: left">1000 Impulse sind aber ausreichend.</span> 1000 pulses are but adequate.</span> <span class="notranslate" onmouseover="_tipon(this)" onmouseout="_tipoff()"><span class="google-src-text" style="direction: ltr; text-align: left">== Die Software == Die Software gibt es hier (2-3GB): [http://usel.net/myTimer/ Download] Aktuell wird noch ein Passwort zum Entpacken benötigt.</span> == == The software The software is available here (2-3GB): [http://usel.net/myTimer/ Download] Current will need a password to unpack.</span> <span class="notranslate" onmouseover="_tipon(this)" onmouseout="_tipoff()"><span class="google-src-text" style="direction: ltr; text-align: left">Das Passwort gibt es per PN nach dem Download.<br /> Dazu benötige ich den User aus dem Kaffee-Netz oder von S1Cafe.</span> The password enables it via PM after downloading. <br /> For this I need the user from the network or from coffee S1Cafe.</span> <span class="notranslate" onmouseover="_tipon(this)" onmouseout="_tipoff()"><span class="google-src-text" style="direction: ltr; text-align: left">In diesen beiden Foren leiste ich Support.<br /> An sonstige Mailadressen sende ich keine Mails.</span> In both of these forums I support bar. <br /> At other mail address I will send no messages.</span> <span class="notranslate" onmouseover="_tipon(this)" onmouseout="_tipoff()"><span class="google-src-text" style="direction: ltr; text-align: left">Deutscher Support wird hier geleistet: [http://www.kaffee-netz.de/threads/vorstellung-projekt-vivaldi-mytimer-wlan-wifi.81665/] English support page is here: [http://s1cafe.com/viewtopic.php?f=26&t=2084] Hier ein Beispiel der Oberfläche durch den Browser eines iPhones aufgerufen: [[Datei: VivaldyMytimer_Iphone.png]] == Einbau == In meiner Vivaldi habe ich den Raspberry in die Maschine eingesetzt.</span> German support is provided here: [http://www.kaffee-netz.de/threads/vorstellung-projekt-vivaldi-mytimer-wlan-wifi.81665/] English support page is here: [http://s1cafe.com /viewtopic.php?f=26&t=2084] Here is an example of the surface through the browser is an iPhone called: [[File: VivaldyMytimer_Iphone.png]] == Installation == In my Vivaldi I have the Raspberry inserted into the machine.</span> <span class="notranslate" onmouseover="_tipon(this)" onmouseout="_tipoff()"><span class="google-src-text" style="direction: ltr; text-align: left">Aus Grund der Temperaturen in der Maschine kann ich dies aber nur bei isolierten Kesseln empfehlen.</span> For reason of the temperatures in the machine I can only recommend in insulated tanks but this.</span> <span class="notranslate" onmouseover="_tipon(this)" onmouseout="_tipoff()"><span class="google-src-text" style="direction: ltr; text-align: left">Bei unisolierten Kesseln empfehle ich den Raspberry hinten an die Vivaldi zu setzen.</span> For uninsulated kettles I recommend to put back to the Vivaldi the Raspberry.</span> <span class="notranslate" onmouseover="_tipon(this)" onmouseout="_tipoff()"><span class="google-src-text" style="direction: ltr; text-align: left">Wenn die Maschine aber sowieso offen ist, ist eine Isolierung mit Armaflex aber auch schnell erledigt.</span> But if the machine is open anyway, an insulation with Armaflex is done but also fast.</span> <span class="notranslate" onmouseover="_tipon(this)" onmouseout="_tipoff()"><span class="google-src-text" style="direction: ltr; text-align: left">'''1.''' Als Erstes muss die Maschine geöffnet werden: [[Datei: VivaldiMyTimer_Offen.jpg]] '''2.''' Das Kabel von der Bedieneinheit zur Steuerungselektronik sollte frei gemacht werden, damit die Steuerungselektronik nach hinten herausgezogen werden kann: [[Datei: VivaldiMyTimer_Offen2.jpg]] [[Datei: VivaldiMyTimer_Offen3.jpg]] '''3.''' Die Stecker sollten beschriftet werden, damit diese auch wieder den richtigen Platz an der Steuerungselektronik finden.</span> '' '1.' '' First, the machine must be opened: [[File: VivaldiMyTimer_Offen.jpg]] '' '2' '' the cable from the control unit to control electronics should be made clear so that the control electronics backwards can be withdrawn: [[File: VivaldiMyTimer_Offen2.jpg]] [[File: VivaldiMyTimer_Offen3.jpg]] '' '3' '' The plugs should be labeled so that they too will find the right place on the control electronics.</span> <span class="notranslate" onmouseover="_tipon(this)" onmouseout="_tipoff()"><span class="google-src-text" style="direction: ltr; text-align: left">[[Datei: VivaldiMyTimer_Blackbox.jpg]] '''4.''' Die Box der Steuerungselektronik öffnen: [[Datei: VivaldiMyTimer_Elektronik.jpg]] '''5.''' Mittels eines Adapterkabels, ziehen wir uns die nötigen Pins heraus.<br /> Wichtig ist hier die Richtung der Markierungen.<br /> Die Nase der Buchsenleiste und die Aussparung der Steckerleiste weisen nach oben!</span> [[File: VivaldiMyTimer_Blackbox.jpg]] open '' '4' '' The Box of control electronics: [[File: VivaldiMyTimer_Elektronik.jpg]] '' '5' '' Using an adapter cable, we dress the necessary pins out. <br /> Important here is the direction of the marks. <br /> The nose of the female connector and the recess of the plug strip facing upwards!</span> <span class="notranslate" onmouseover="_tipon(this)" onmouseout="_tipoff()"><span class="google-src-text" style="direction: ltr; text-align: left">[[Datei: VivaldiMyTimer_Adapter1.jpg]] [[Datei: VivaldiMyTimer_Adapter2.jpg]] '''6'''.</span> [[File: VivaldiMyTimer_Adapter1.jpg]] [[File: VivaldiMyTimer_Adapter2.jpg]] '' '6' ''.</span> <span class="notranslate" onmouseover="_tipon(this)" onmouseout="_tipoff()"><span class="google-src-text" style="direction: ltr; text-align: left">Wir benötigen für das Relais zum Ein-/Ausschalten nur die Adern 1 (rot) und 11.<br /> Für die Option "Rückspülautomatik" benötigen wir die Adern 2 und 7. (7 ist der Doppelbezug, 2 und 5 (Einzelbezug) würde auch gehen).<br /> Für die Option "Boilerabschakltung" benötigen wir die Adern 2 und 9.<br /> <br />Alle anderen entfernen wir.</span> We need for the relay on / off only the veins 1 (red) and 11. <br /> For the "backwash" option we need the wires 2 and 7 (7 is the double reference, 2 and 5 (single reference) would go). <br /> For the "Boilerabschakltung" option we need the wires 2 and 9. <br /> <br /> All other we remove.</span> <span class="notranslate" onmouseover="_tipon(this)" onmouseout="_tipoff()"><span class="google-src-text" style="direction: ltr; text-align: left"><br /> Die beiden Adern stecken wir in einen Schrumpfschlauch.</span> <br /> The two veins we are stuck in a shrink tube.</span> <span class="notranslate" onmouseover="_tipon(this)" onmouseout="_tipoff()"><span class="google-src-text" style="direction: ltr; text-align: left">[[Datei: VivaldiMyTimer_Adapter3.jpg]] [[Datei: VivaldiMyTimer_Adapter4.jpg]] '''7.''' Adapterkabel einsetzen.</span> Insert '' '7' 'adapter cable [[file: VivaldiMyTimer_Adapter3.jpg]] [VivaldiMyTimer_Adapter4.jpg] [file].</span> <span class="notranslate" onmouseover="_tipon(this)" onmouseout="_tipoff()"><span class="google-src-text" style="direction: ltr; text-align: left">[[Datei: VivaldiMyTimer_Adapter5.jpg]] '''8.''' Option 1: Vorbereiten der Mengenautomatik (nur nötig, wenn diese Funktion gewünscht ist) Hierzu wird am Stecker direkt neben dem Flachbandkabel die grüne Ader durchtrennt und verlängert, damit diese später über unser Relais geschaltet werden kann: [[Datei: VivaldiMyTimer_Dose.jpg]] '''9.''' Jetzt wird das Kabel zwischen Relais und Raspberry konfektioniert.</span> [[File: VivaldiMyTimer_Adapter5.jpg]] '' '8' '' Option 1: Preparing the automatic load detection (only necessary if this function is desired) To this end, the plug next to the ribbon cable is severed and lengthened the green wire, so that they can be switched later through our relay: [[File: VivaldiMyTimer_Dose.jpg]] '' '9' '' Now the cable between relay and Raspberry is assembled.</span> <span class="notranslate" onmouseover="_tipon(this)" onmouseout="_tipoff()"><span class="google-src-text" style="direction: ltr; text-align: left"><br /> Ich habe Lötanschlüsse gewählt.</span> <br /> I have chosen solder connections.</span> <span class="notranslate" onmouseover="_tipon(this)" onmouseout="_tipoff()"><span class="google-src-text" style="direction: ltr; text-align: left">Es gibt aber auch eine Reihe von Relaisherstellern mit Schraubanschlüssen.</span> But there are also a number of relays with screw manufacturers.</span> <span class="notranslate" onmouseover="_tipon(this)" onmouseout="_tipoff()"><span class="google-src-text" style="direction: ltr; text-align: left">Damit wären dann keinerlei Lötarbeiten beim Umbau nötig.</span> So then no soldering would be necessary during the conversion.</span> <span class="notranslate" onmouseover="_tipon(this)" onmouseout="_tipoff()"><span class="google-src-text" style="direction: ltr; text-align: left">Auf den Relaisplatinen sind die Anschlüsse normalerweise gut beschriftet.</span> On the relay boards, the connections are usually labeled well.</span> <span class="notranslate" onmouseover="_tipon(this)" onmouseout="_tipoff()"><span class="google-src-text" style="direction: ltr; text-align: left">Am Raspberry nutzen wir folgende Pins: '''Für den Timer''' Raspberry Pin2 (+5V) ---> Relais VCC<br /> Raspberry Pin 14 (Masse) ---> Relais GND<br /> Raspberry Pin 15 (Gpio22) ---> Relais IN '''Option 1: Umschaltung Mengenautomatik/manueller Bezug''' Diese Option ist empfehlenswert.</span> On Raspberry we use the following pins: '' 'For the timer' '' Raspberry Pin2 (+ 5V) ---> VCC relays <br /> Raspberry Pin 14 (ground) ---> relays GND <br /> Raspberry Pin 15 (Gpio22) ---> relay '' 'Option 1: Switching automatic load / reference manual' '' This option is recommended.</span> <span class="notranslate" onmouseover="_tipon(this)" onmouseout="_tipoff()"><span class="google-src-text" style="direction: ltr; text-align: left">Wir benötigen nur eine weitere Ader und eine Relaisplatine mit zwei Relais kostet nur ca. 1,- EUR mehr als die Platine mit nur einem Relais.</span> We only need another artery and a relay board with two relay only costs about 1, - EUR more than the board with only one relay.</span> <span class="notranslate" onmouseover="_tipon(this)" onmouseout="_tipoff()"><span class="google-src-text" style="direction: ltr; text-align: left">Raspberry Pin 16 (Gpio23) ---> Relais2 IN '''Option 2: Energiemessgerät''' Als zweite Funktion kann eine Energiemessgerät eingebaut werden.</span> Raspberry Pin 16 (Gpio23) ---> Relay2 IN '' 'Option 2: Energy Meter' '' As a second function, a power meter to be installed.</span> <span class="notranslate" onmouseover="_tipon(this)" onmouseout="_tipoff()"><span class="google-src-text" style="direction: ltr; text-align: left">Es sendet je verbrauchter kWh je nach Bauart 1000 oder 2000 Impulse an den Raspberry.<br /> Diese Impulse können wir auswerten und uns den Verbrauch und über den kWh-Preis die Kosten anzeigen lassen.<br /> Für für das Messgerät ca. 20,- EUR Raspberry Pin 5 (Gpio03) ---> Messgerät S0 +<br /> Raspberry Pin 6 (Masse) ---> Messgerät S0 - '''Option 3: Shottimer inkl. Shotverwaltung''' Ein Relais parallel zum Magnetventil liefert uns den nötigen Kontakt.</span> It sends each consumed kWh depending on the model 1000 or 2000 pulses to the Raspberry. <br /> These pulses we can evaluate and let the consumption and the kWh-price show the cost. <br /> For the meter for approximately 20, - EUR Raspberry Pin 5 (Gpio03) ---> meter S0 + <br /> Raspberry pin 6 (ground) ---> meter S0 - '' 'Option 3: Shot Timer Shot VAT administration.' '' A parallel relay the solenoid valve provides us with the necessary contact.</span> <span class="notranslate" onmouseover="_tipon(this)" onmouseout="_tipoff()"><span class="google-src-text" style="direction: ltr; text-align: left">PINs:<br /> Raspberry Pin 3 (Gpio02) ---> Relais5 Schließer<br /> Raspberry Pin 6 (Masse) ---> Relais5 Schließer (gleicher PIN wie bei Option 2) '''Option 4: Rückspülautomatik''' Raspberry Pin2 (+5V) ---> Relais3 VCC<br /> Raspberry Pin 14 (Masse) ---> Relais3 GND<br /> Raspberry Pin 18 (Gpio24) ---> Relais3 IN Der Schließer des Relais geht auf das Bedienteil Adern 2 und 7. '''Option 5: Boilerabschaltung''' Raspberry Pin2 (+5V) ---> Relais4 VCC<br /> Raspberry Pin 14 (Masse) ---> Relais4 GND<br /> Raspberry Pin 22 (Gpio25) ---> Relais4 IN Der Schließer des Relais geht auf das Bedienteil Adern 2 und 9. '''10.''' Für die Kabel benötigen wir eine Aussparung am Gehäuse.<br /> Ich habe diese direkt an der Cinch-Buchse erweitert und dann die Kabel durchgezogen.</span> PINs: <br /> Raspberry Pin 3 (Gpio02) ---> RELAY5 closer <br /> Raspberry pin 6 (ground) ---> RELAY5 NO (PIN same as in option 2) '' 'Option 4: Rückspülautomatik' '' Raspberry Pin2 (+ 5V) ---> VCC Relay3 <br /> Raspberry Pin 14 (ground) ---> Relay3 GND <br /> Raspberry Pin 18 (Gpio24) ---> Relay3 IN contact of the relay going to the control panel wires 2 and 7. '' 'Option 5: Boiler shutdown' '' Raspberry Pin2 (+ 5V) ---> VCC Relay4 <br /> Raspberry Pin 14 (ground) ---> Relay4 GND <br / > Raspberry Pin 22 (GPIO25) ---> Relay4 IN contact of the relay goes to the control panel wires 2 and 9. '' '10. '' 'For the cables we need a recess on the housing. <br /> I have this extends directly to the female RCA connector and then pulled through the cable.</span> <span class="notranslate" onmouseover="_tipon(this)" onmouseout="_tipoff()"><span class="google-src-text" style="direction: ltr; text-align: left">[[Datei: VivaldiMyTimer_Gehaeuse1.jpg]] [[Datei: VivaldiMyTimer_Gehaeuse2.jpg]] '''11.''' Das verschlossene Gehäuse kann mit einem Isolierband etwas gegen eventuelle Feuchtigkeit geschützt werden.<br /> (Auf Grund der vielen Öffnungen am Gehäuse ist das eher eine Alibiarbeit ;) ) [[Datei: VivaldiMyTimer_Gehaeuse3.jpg]] '''12.''' Anschluss der Relaisplatine GPIO22 schaltet die Maschine ein und aus.</span> [[File: VivaldiMyTimer_Gehaeuse1.jpg]] [[File: VivaldiMyTimer_Gehaeuse2.jpg]] ''. '11 '' 'The sealed casing can be protected with an insulating anything against any moisture <br /> (Due to the many openings. the housing that's more of a Alibi work;)) [[File: VivaldiMyTimer_Gehaeuse3.jpg]] ''. '12 '' 'connection of the relay board GPIO22 turns the machine on and off.</span> <span class="notranslate" onmouseover="_tipon(this)" onmouseout="_tipoff()"><span class="google-src-text" style="direction: ltr; text-align: left">Die beiden Kabel aus dem Adapterkabel der Steuereinheit kommen auf den Schließer.</span> The two cables from the adapter cable to the control unit come on normally.</span> <span class="notranslate" onmouseover="_tipon(this)" onmouseout="_tipoff()"><span class="google-src-text" style="direction: ltr; text-align: left">GPIO23 schaltet die Mengenautomatik.</span> GPIO23 switches the automatic load.</span> <span class="notranslate" onmouseover="_tipon(this)" onmouseout="_tipoff()"><span class="google-src-text" style="direction: ltr; text-align: left">Die beiden verlängerten Adern des grünen Anschlusses kommen auf den Öffner.</span> The two extended cores of the green terminal come on the opener.</span> <span class="notranslate" onmouseover="_tipon(this)" onmouseout="_tipoff()"><span class="google-src-text" style="direction: ltr; text-align: left">Das Anschlußbild ist auf dem Foto unter den Adern zu erkennen.</span> The connection diagram can be seen in the photo below the veins.</span> <span class="notranslate" onmouseover="_tipon(this)" onmouseout="_tipoff()"><span class="google-src-text" style="direction: ltr; text-align: left">[[Datei: VivaldiMyTimer_Relais1.jpg]] Hier ein Foto der noch nicht angeschlossenen Relais.</span> [[File: VivaldiMyTimer_Relais1.jpg]] Here is a photo of the not connected relays.</span> <span class="notranslate" onmouseover="_tipon(this)" onmouseout="_tipoff()"><span class="google-src-text" style="direction: ltr; text-align: left">Wer auf die Option 1 (Mengenautomatik) verzichtet hat natürlich nur ein Relais.</span> Who renounces the option 1 (automatic load detection) of course has only one relay.</span> <span class="notranslate" onmouseover="_tipon(this)" onmouseout="_tipoff()"><span class="google-src-text" style="direction: ltr; text-align: left">Wer gleich drei Relais einsetzt, ist für die kommende Option "automatisches Reinigungsprogramm" gerüstet.</span> Anyone who uses three relays, is prepared for the coming option "automatic cleaning program".</span> <span class="notranslate" onmouseover="_tipon(this)" onmouseout="_tipoff()"><span class="google-src-text" style="direction: ltr; text-align: left">[[Datei: VivaldiMyTimer_Relais2.jpg]] '''13.''' Das fertig angeschlossene Relais sollte vor Kurzschlüssen geschützt werden, da wir es mit in das Gehäuse der Steuerelektronik legen.</span> [[File: VivaldiMyTimer_Relais2.jpg]] ''. '13 '' 'The ready connected relays should be protected against short circuits, as we put it in with the casing of the control electronics.</span> <span class="notranslate" onmouseover="_tipon(this)" onmouseout="_tipoff()"><span class="google-src-text" style="direction: ltr; text-align: left"><br /> Ich habe einen Schrumpfschlauch genutzt.</span> <br /> I have used a shrink tube.</span> <span class="notranslate" onmouseover="_tipon(this)" onmouseout="_tipoff()"><span class="google-src-text" style="direction: ltr; text-align: left">Umwickeln mit Isolierband sollte aber auch reichen.</span> Wrap with electrical tape should also rich.</span> <span class="notranslate" onmouseover="_tipon(this)" onmouseout="_tipoff()"><span class="google-src-text" style="direction: ltr; text-align: left">[[Datei: VivaldiMyTimer_Relais3.jpg]] '''14.''' Hier findet sich noch Platz für unser Relais.</span> [[File: VivaldiMyTimer_Relais3.jpg]] ''. '14 '' 'Here there is still space for our relays.</span> <span class="notranslate" onmouseover="_tipon(this)" onmouseout="_tipoff()"><span class="google-src-text" style="direction: ltr; text-align: left"><br /> Jetzt kann das Gehäuse der Steuereinheit wieder geschlossen werden.</span> <br /> Now the housing of the control unit can be closed again.</span> <span class="notranslate" onmouseover="_tipon(this)" onmouseout="_tipoff()"><span class="google-src-text" style="direction: ltr; text-align: left">[[Datei: VivaldiMyTimer_Relais4.jpg]] '''15.''' Nun fehlt nur noch der Stomanschluß für unseren Raspberry.<br /> Dafür schneiden wir aus der Verlängerung einfach die Kupplung ab und schließen diese an das Netzkabel der Vivaldi an.</span> [[File: VivaldiMyTimer_Relais4.jpg]] '. '15' '' 'Now only missing the Stomanschluß for our Raspberry <br /> For this we cut out the extension simply the clutch off and connect it to the power cord of Vivaldi. ,</span> <span class="notranslate" onmouseover="_tipon(this)" onmouseout="_tipoff()"><span class="google-src-text" style="direction: ltr; text-align: left">[[Datei: VivaldiMyTimer_Strom1.jpg]] '''16.''' Option 2: Stromzähler (nur wenn gewünscht) Jetzt kann auch leicht der Stromzähler eingebaut werden.</span> [[File: VivaldiMyTimer_Strom1.jpg]] '' '16. '' 'Option 2: electricity meter (only if necessary) can now also easily the electricity meter be installed.</span> <span class="notranslate" onmouseover="_tipon(this)" onmouseout="_tipoff()"><span class="google-src-text" style="direction: ltr; text-align: left"><br /> Einfach das Netzkabel der Vivaldi etwas in die Maschine ziehen, bis es bis zur Tassenablage reicht.</span> <br /> Just the power cord of Vivaldi pull something into the machine until it reaches to the cup warmer.</span> <span class="notranslate" onmouseover="_tipon(this)" onmouseout="_tipoff()"><span class="google-src-text" style="direction: ltr; text-align: left">[[Datei: VivaldiMyTimer_Strom2.jpg]] Das Kabel an der obersten Stelle auftrennen und den Stromzähler einsetzen.</span> [[File: VivaldiMyTimer_Strom2.jpg]] split the cable at the uppermost position and insert the electricity meter.</span> <span class="notranslate" onmouseover="_tipon(this)" onmouseout="_tipoff()"><span class="google-src-text" style="direction: ltr; text-align: left">L ist die braune Ader Richtung Steckdose.<br /> N die blaue Ader Richtung Steckdose.</span> L <br /> N is the brown wire direction outlet. The blue wire towards outlet.</span> <span class="notranslate" onmouseover="_tipon(this)" onmouseout="_tipoff()"><span class="google-src-text" style="direction: ltr; text-align: left">Die Ausgänge sind entsprechend beschriftet.</span> The outputs are labeled accordingly.</span> <span class="notranslate" onmouseover="_tipon(this)" onmouseout="_tipoff()"><span class="google-src-text" style="direction: ltr; text-align: left">S0+ geht zum Raspberry Pin5 (GPIO3).<br /> S0+ geht zum Raspberry Pin6 (Masse).</span> S0 + goes to Raspberry Pin5 (GPIO3). <br /> + S0 goes to Raspberry Pin6 (mass).</span> <span class="notranslate" onmouseover="_tipon(this)" onmouseout="_tipoff()"><span class="google-src-text" style="direction: ltr; text-align: left">Sollte der Stromzähler wie meiner ein Display haben, so muss das nicht sichtbar sein, da wir die Werte über den Raspberry auslesen.</span> If the electricity meter as a display my have, so must not be visible, as we read the values on the Raspberry.</span> <span class="notranslate" onmouseover="_tipon(this)" onmouseout="_tipoff()"><span class="google-src-text" style="direction: ltr; text-align: left">[[Datei: VivaldiMyTimer_Stromzaehler.jpg]] '''17.''' Option 3: Shottimer (nur wenn gewünscht) Den Shottimer greifen wir am Relais für das Magnetventil ab.</span> [[File: VivaldiMyTimer_Stromzaehler.jpg]] '' '17. '' 'Option 3: Shot Timer (only if desired) the Shot Timer we grab from the relay for the solenoid valve.</span> <span class="notranslate" onmouseover="_tipon(this)" onmouseout="_tipoff()"><span class="google-src-text" style="direction: ltr; text-align: left">Auf Grund der Größe und um einen potentialfreien Kontakt zu erhalten habe ich ein Reedrelais mit eingebauter Freilaufdiode genutzt.</span> Obtain Due to the size and a potential free contact, I have used a reed relay with built-in freewheeling diode.</span> <span class="notranslate" onmouseover="_tipon(this)" onmouseout="_tipoff()"><span class="google-src-text" style="direction: ltr; text-align: left">Die Lötstellen, an denen wir das Relais anlöten können sehen wir auf folgendem Bild.</span> The solder points on which we can solder the relay we see in the following image.</span> <span class="notranslate" onmouseover="_tipon(this)" onmouseout="_tipoff()"><span class="google-src-text" style="direction: ltr; text-align: left">!!</span> !!</span> <span class="notranslate" onmouseover="_tipon(this)" onmouseout="_tipoff()"><span class="google-src-text" style="direction: ltr; text-align: left">Achtung !!</span> Caution !!</span> <span class="notranslate" onmouseover="_tipon(this)" onmouseout="_tipoff()"><span class="google-src-text" style="direction: ltr; text-align: left">Leider sind auf den Foto die Adern (+/-) vertauscht.</span> Unfortunately, the cores (+/-) are reversed on the photo.</span> <span class="notranslate" onmouseover="_tipon(this)" onmouseout="_tipoff()"><span class="google-src-text" style="direction: ltr; text-align: left">Nach der Korrektur habe ich vergessen ein neues Bild zu machen.</span> After correction I forgot to make a new image.</span> <span class="notranslate" onmouseover="_tipon(this)" onmouseout="_tipoff()"><span class="google-src-text" style="direction: ltr; text-align: left">[[Datei:Shottimer_Platine.JPG]] Und hier das genutzte Reedrelais.</span> [[File: Shottimer_Platine.JPG]] And here the used reed relays.</span> <span class="notranslate" onmouseover="_tipon(this)" onmouseout="_tipoff()"><span class="google-src-text" style="direction: ltr; text-align: left">Das gibt es ebenfalls günstig bei Reichelt (Art.-Nr. SIL 7271-D 12V).</span> That there are also favorable at Reichelt (SIL No. 7271-D 12V).</span> <span class="notranslate" onmouseover="_tipon(this)" onmouseout="_tipoff()"><span class="google-src-text" style="direction: ltr; text-align: left">Die Bezeichnung lautet: SA12-1A72-71D [[Datei:Shottimer_Reedrelais.JPG]] '''18.''' Nun kann alles wieder zusammengebaut werden.<br /> Den Raspberry habe ich bei mir oben unter der Tassenablage verstaut.<br /> Die SD-Karte zeigt nach oben, damit ich leicht einen Firmwarewechsel vornehmen kann.<br /> Mit Kabelbindern kann der Strommesser und der Raspberry fixiert werden.</span> The designation reads: SA12-1A72-71D [[File: Shottimer_Reedrelais.JPG]] '. '18.' '' 'Now everything can be reassembled <br /> The Raspberry I tucked in my top of the cup warmer. " br /> The SD card is facing up, so I can easily make a firmware change. <br /> the ammeter and the Raspberry can be fixed with cable ties.</span> <span class="notranslate" onmouseover="_tipon(this)" onmouseout="_tipoff()"><span class="google-src-text" style="direction: ltr; text-align: left">[[Datei: VivaldiMyTimer_Einbauort.jpg]] '''19'''.</span> [[File: VivaldiMyTimer_Einbauort.jpg]] '' '19' ''.</span> <span class="notranslate" onmouseover="_tipon(this)" onmouseout="_tipoff()"><span class="google-src-text" style="direction: ltr; text-align: left">Nun benötigen wir noch die Software.</span> Now we need the software.</span> <span class="notranslate" onmouseover="_tipon(this)" onmouseout="_tipoff()"><span class="google-src-text" style="direction: ltr; text-align: left">Das Image werde ich hier im Board zur Verfügung stellen.</span> The Image I'll put here on the board are available.</span> <span class="notranslate" onmouseover="_tipon(this)" onmouseout="_tipoff()"><span class="google-src-text" style="direction: ltr; text-align: left">Link folgt.</span> Link follows.</span> <span class="notranslate" onmouseover="_tipon(this)" onmouseout="_tipoff()"><span class="google-src-text" style="direction: ltr; text-align: left">Mit dem Tool „Win32 Disk Imager“ wird es auf die SD-Karte geschrieben.<br /> Anschließend in den Raspberry stecken und per Kabel an das Netzwerk anschließen.<br /> Jetzt den Stecker der Vivaldi in die Steckdose.</span> With the tool "Win32 Disk Imager" it is written to the SD card. <br /> Then, plug in the Raspberry and connect via cable to the network. <br /> The plug of Vivaldi in the socket now.</span> <span class="notranslate" onmouseover="_tipon(this)" onmouseout="_tipoff()"><span class="google-src-text" style="direction: ltr; text-align: left">Nach 2 Minuten sollte die Weboberfläche unter http://vivaldi/ erreichbar sein.</span> After 2 minutes, the web interface should at http: // be Vivaldi / reach.</span> <span class="notranslate" onmouseover="_tipon(this)" onmouseout="_tipoff()"><span class="google-src-text" style="direction: ltr; text-align: left">Der Login lautet: viv<br /> Passwort: viv Nun kann ein Test der richtigen Verdrahtung der Relais erfolgen.</span> The login is: viv <br /> Password: viv now a test of the correct wiring of the relay can be carried out.</span> <span class="notranslate" onmouseover="_tipon(this)" onmouseout="_tipoff()"><span class="google-src-text" style="direction: ltr; text-align: left">'''20.''' Im Menue „Settings“, das über das Zahnradsymbol unten rechts erreichbar ist, können Systemeinstellungen erfolgen.</span> '' '20. '' 'In the "Settings" menu, which is accessible through the gear icon at the bottom right may be broken system settings.</span> <span class="notranslate" onmouseover="_tipon(this)" onmouseout="_tipoff()"><span class="google-src-text" style="direction: ltr; text-align: left">Hier wird die SSID und der WAP-Key des WLAN-Netzwerks eingetragen.</span> Here, the SSID and the WAP-Key of the WLAN network is entered.</span> <span class="notranslate" onmouseover="_tipon(this)" onmouseout="_tipoff()"><span class="google-src-text" style="direction: ltr; text-align: left">Anschließend muss der Netzstecker (Strom) kurz gezogen werden und das LAN-Kabel gezogen werden.<br /> Stromstecker wieder einstecken.</span> Then the power plug (Power) <br /> power plug must be pulled short and the LAN cables are pulled. Plug it in again.</span> <span class="notranslate" onmouseover="_tipon(this)" onmouseout="_tipoff()"><span class="google-src-text" style="direction: ltr; text-align: left">Nach 2 Minuten sollte die Weboberfläche per WLAN erreichbar sein.</span> After 2 minutes, the web interface should be accessible via WLAN.</span> <span class="notranslate" onmouseover="_tipon(this)" onmouseout="_tipoff()"><span class="google-src-text" style="direction: ltr; text-align: left">'''Hinweis:''' Vermutlich funktioniert nur WPA2.</span> '' 'Note:' '' Probably only works WPA2.</span> <span class="notranslate" onmouseover="_tipon(this)" onmouseout="_tipoff()"><span class="google-src-text" style="direction: ltr; text-align: left">Evtl.</span> Possibly</span> <span class="notranslate" onmouseover="_tipon(this)" onmouseout="_tipoff()"><span class="google-src-text" style="direction: ltr; text-align: left">gibt es auch bei einigen Sonderzeichen im WPA-Key Probleme.</span> there are also some special characters in the WPA Key problems.</span> <span class="notranslate" onmouseover="_tipon(this)" onmouseout="_tipoff()"><span class="google-src-text" style="direction: ltr; text-align: left">Wenn alles funktioniert habt ihr es geschafft und das Gehäuse kann geschlossen werden.</span> If everything works you have done it and the housing can be closed.</span> <span class="notranslate" onmouseover="_tipon(this)" onmouseout="_tipoff()"><span class="google-src-text" style="direction: ltr; text-align: left">== Sonstiges == ''' Schalten durch Webaufruf''' Hier die Möglichkeit die Vivaldi direkt über Webaufruf zu schalten.<br /> Dies kann für diverse Automatisierungen genutzt werden.</span> == Other == '' 'Turn by Webaufruf' '' Here is the possibility to switch directly from the Vivaldi Webaufruf. <br /> This can be used for various automation.</span> <span class="notranslate" onmouseover="_tipon(this)" onmouseout="_tipoff()"><span class="google-src-text" style="direction: ltr; text-align: left">zB FHEM Einschalten: http://username:password@vivaldi/gpio_on.php <br \> Ausschalten: http://username:password@vivaldi/gpio_off.php ''' Timezone ''' A hint for my non german users: You will have a timezone problem, because the image is configured to german timezone.</span> eg FHEM switching: http: // username: password@vivaldi/gpio_on.php <br \> off: http: // username: password@vivaldi/gpio_off.php '' 'Time Zone' '' A hint for my non German users : You will have a timezone problem, Because The image is configured to German timezone.</span> <span class="notranslate" onmouseover="_tipon(this)" onmouseout="_tipoff()"><span class="google-src-text" style="direction: ltr; text-align: left">It is easy to change this via console: To change timezone, please use the program [http://the.earth.li/~sgtatham/putty/latest/x86/putty.exe Putty] to enter the shell of the raspberry.</span> It is easy to change this via console: to change timezone, please use the program [http://the.earth.li/~sgtatham/putty/latest/x86/putty.exe Putty] to enter the shell of the raspberry.</span> <span class="notranslate" onmouseover="_tipon(this)" onmouseout="_tipoff()"><span class="google-src-text" style="direction: ltr; text-align: left">User: pi Password: vivaldi Use "sudo raspi-config" to change timezone.</span> User: pi Password: Vivaldi use "sudo Raspi-config" to change timezone.</span> | + | == '''Screenshots''' == |
| | + | |
| | + | The web interface is available from PC / tablet or smartphone via web browser. |
| | + | |
| | + | The timer includes manual on / off and change the automatic / manual dose. |
| | + | |
| | + | [[File: VivaldiMyTimer_Timer.png]] |
| | + | |
| | + | |
| | + | shot timer / shot administrative |
| | + | |
| | + | [[File: VivaldiMyTimer_Shot.png]] |
| | + | |
| | + | |
| | + | user management |
| | + | |
| | + | [[File: VivaldiMyTimer_Rights.png]] |
| | + | |
| | + | |
| | + | configuration |
| | + | |
| | + | [[File: VivaldiMyTimer_Settings.png]] |
| | + | |
| | + | == '''Security note''' == |
| | + | The tasks described here may only be carried out by competent persons. When working on high voltage (120V/230V) can be deadly. Moreover, in case of errors the machine may be damaged. |
| | + | |
| | + | == '''Disclaimer''' == |
| | + | This description portrays the modification of my machine. There is no guarantee that errors have crept in. For this reason, do not accept all descriptions 1 : 1. It is intended primarily to be able to understand the work and to pay an own modification without this description. I am not responsible for any damage! This description is an initial draft. It would be glad if someone would check the description is correct. Suggestions, corrections and additional photos are welcome. |
| | + | |
| | + | == '''The material''' == |
| | + | The Raspberry PI (Rev. 2), a housing, a 4GB SD card, a WLAN stick, an AC adapter and an extension to realize a socket inside the Vivaldi for the power adapter. Who mounts the Raspberry externally, can also operate with a standard electrical outlet. |
| | + | |
| | + | Note: The Raspberry PI (Rev. 2) is not 100% compatible with the Rev. 1. Due to the modified connector strip is not running the software provided correct. |
| | + | |
| | + | Raspberry PI B + is pin-compatible and can therefore be used. |
| | + | |
| | + | |
| | + | [[File: VivaldiMyTimer_Raspberry.png]] |
| | + | |
| | + | |
| | + | The cable and a relay. |
| | + | |
| | + | [[File: VivaldiMyTimer_Kabel.png]] |
| | + | |
| | + | |
| | + | The components can be bougt at Reichelt: [http://www.reichelt.de/?ACTION=20;AWKID=963127;PROVID=2084 here the shopping chart] |
| | + | |
| | + | Then we need a the relay board with one or two relays. Here helps ebay search for "relays raspberry". Screws on both sides avoid soldering. |
| | + | |
| | + | For option 2, a elecric meter is required. Ebay search for "electricity meter S0" will show some. There are models with different pulses per kW. The higher the value, the more accurate the count. 1000 pulses are but adequate. |
| | + | |
| | + | |
| | + | == '''The software''' == |
| | + | |
| | + | The software is available here (2-3GB): [http://usel.net/myTimer/ Download] |
| | + | |
| | + | The password for the image is: only4Testing |
| | + | |
| | + | <br /> |
| | + | For this I need the user from KaffeNetz or from S1Cafe. In both of these forums I will support myTimer. |
| | + | To other mail address I will not send messages. |
| | + | |
| | + | German support is provided here: [http://www.kaffee-netz.de/threads/vorstellung-projekt-vivaldi-mytimer-wlan-wifi.81665/] |
| | + | |
| | + | English support page is here: [http://s1cafe.com/viewtopic.php?f=26&t=2084] |
| | + | |
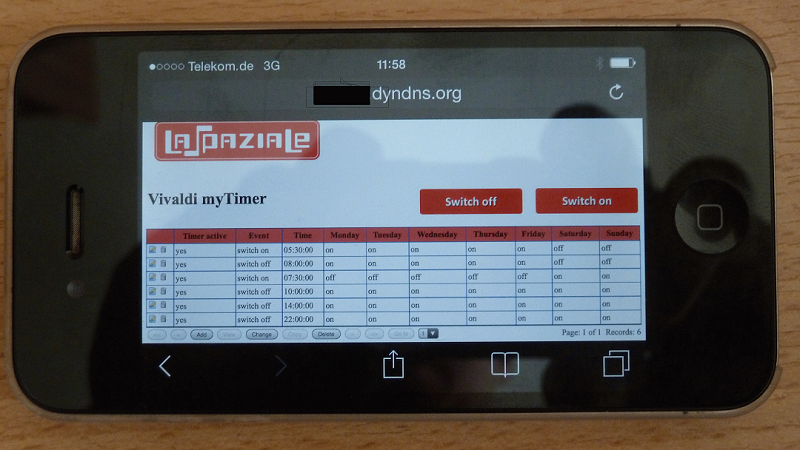
| | + | Here is an example of the surface through the browser of an iPhone: |
| | + | |
| | + | [[Datei: VivaldyMytimer_Iphone.png]] |
| | + | |
| | + | == '''Installation''' == |
| | + | |
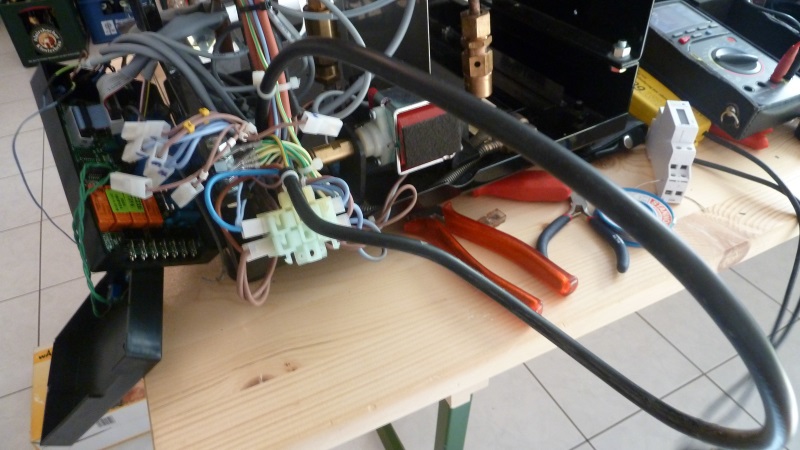
| | + | In my Vivaldi I mounted the Raspberry inside the machine. For temperature reasons i can only recommend this if the boilers are isolated. For unisolated kettles I recommend to put the Raspberry onto the back of the Vivaldi. But if the machine is open anyway, an isolation with Armaflex is done also fast. |
| | + | |
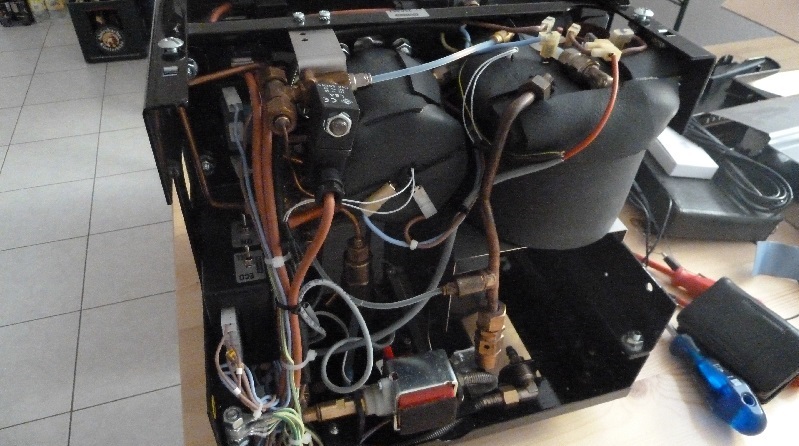
| | + | '''1.''' First, the machine must be opened: |
| | + | |
| | + | [[File: VivaldiMyTimer_Offen.jpg]] |
| | + | |
| | + | |
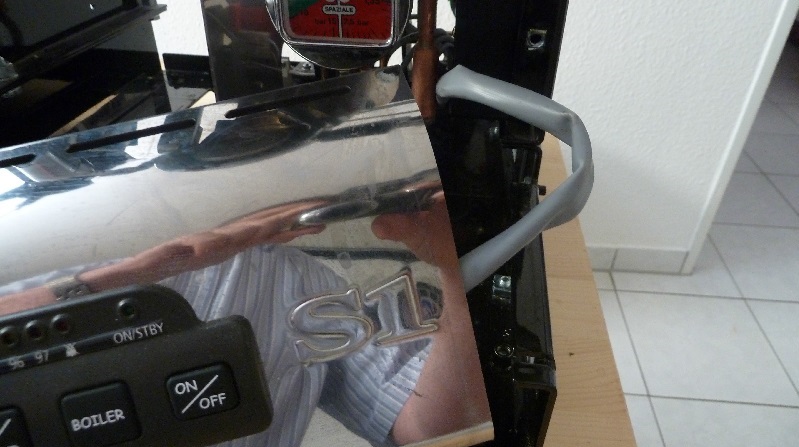
| | + | '''2.''' Connect cable from the control panel to control electronics should be made free, so that the control electronics can be pulled to the rear: |
| | + | |
| | + | [[File: VivaldiMyTimer_Offen2.jpg]] |
| | + | |
| | + | [[File: VivaldiMyTimer_Offen3.jpg]] |
| | + | |
| | + | |
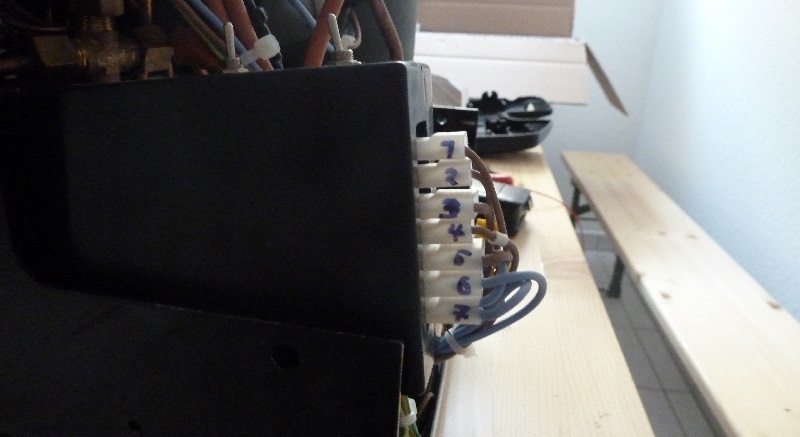
| | + | '''3.''' The plugs should be labeled so that they will find the right place on the control electronics when mounting again. |
| | + | |
| | + | [[File: VivaldiMyTimer_Blackbox.jpg]] |
| | + | |
| | + | |
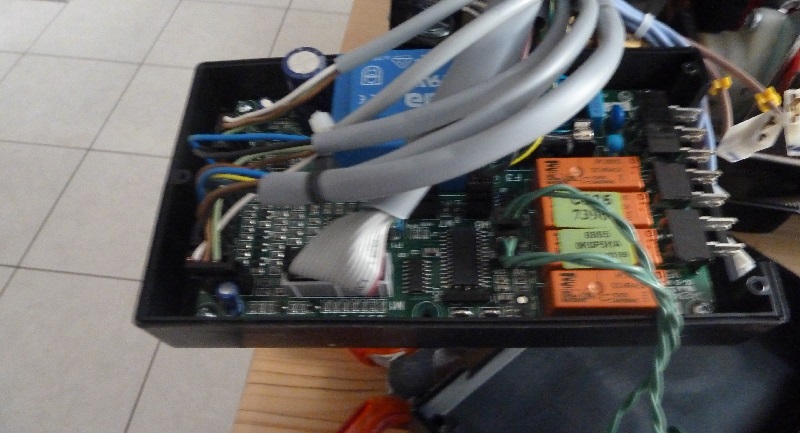
| | + | '''4.''' Open the box of the control electronics: |
| | + | |
| | + | [[File: VivaldiMyTimer_Elektronik.jpg]] |
| | + | |
| | + | |
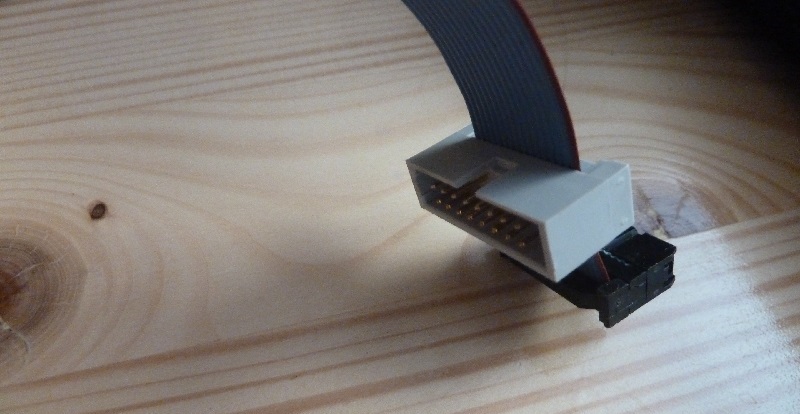
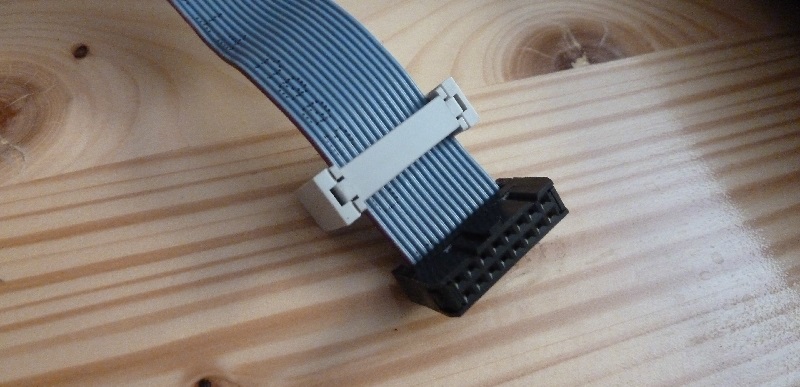
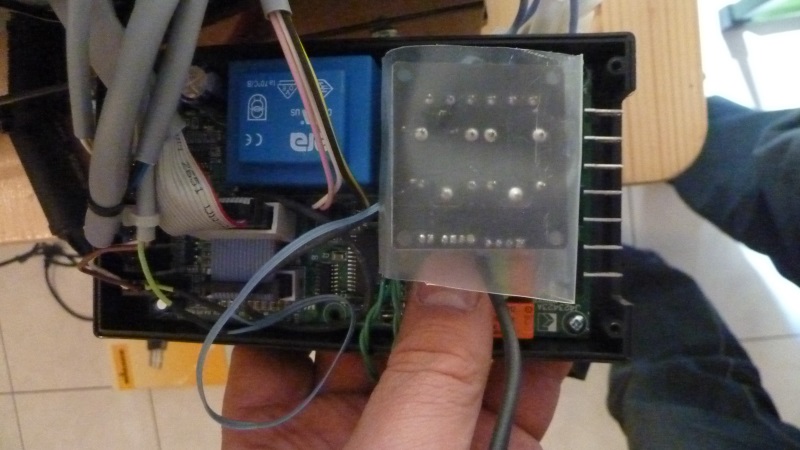
| | + | '''5.''' With an adapter cable, we split the necessary pins out. |
| | + | Important here is the direction of the markings. |
| | + | The nose of the female connector and the recess of the plug strip facing upwards! |
| | + | |
| | + | [[File: VivaldiMyTimer_Adapter1.jpg]] |
| | + | |
| | + | [[File: VivaldiMyTimer_Adapter2.jpg]] |
| | + | |
| | + | |
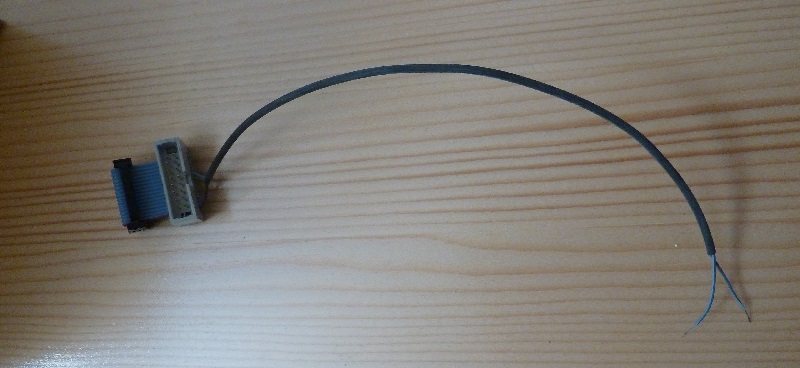
| | + | '''6.''' We need only the wire 1 (red) and 11 for the relay on / off. |
| | + | For the "backflush" option we need the wires 2 and 7 (7 is the double shot, 2 and 5 (single shot) would also be OK). |
| | + | For the "switch of steam boiler " option we need the wires 2 and 9. |
| | + | |
| | + | All other wires will be removed. |
| | + | The two wires we stuck in a shrink tube. |
| | + | |
| | + | [[File: VivaldiMyTimer_Adapter3.jpg]] |
| | + | |
| | + | [[File: VivaldiMyTimer_Adapter4.jpg]] |
| | + | |
| | + | |
| | + | '''7.''' Insert adapter cable. |
| | + | |
| | + | [[File: VivaldiMyTimer_Adapter5.jpg]] |
| | + | |
| | + | |
| | + | '''8.''' Option 1: |
| | + | |
| | + | Preparing for automatic dose (only necessary if this function is desired) |
| | + | |
| | + | For this purpose, the plug next to the ribbon cable is severed and lengthened the green wire, so that it can be connected later on our relays: |
| | + | |
| | + | [[File: VivaldiMyTimer_Dose.jpg]] |
| | + | |
| | + | |
| | + | '''9.''' Now the cable between relay and Raspberry is assembled.<br /> |
| | + | I chose solder connections. But there are also relays available with screws. So no soldering would be necessary during the modification. |
| | + | |
| | + | On the relay boards, the connections are usually labeled well. |
| | + | |
| | + | On Raspberry we use the following pins: |
| | + | |
| | + | |
| | + | '''For the timer''' |
| | + | |
| | + | Raspberry Pin 2 (+ 5V) ---> VCC relay<br \> |
| | + | Raspberry Pin 14 (ground) ---> relay GND |
| | + | Raspberry Pin 15 (Gpio22) ---> relay |
| | + | |
| | + | |
| | + | '''Option 1: Switching automatic shot / manual shot''' |
| | + | |
| | + | This option is recommended. We only need another wire and a relay board with two relays. This costs only about 1,- US$ more than a board with only one relay. |
| | + | |
| | + | Raspberry Pin 16 (Gpio23) ---> Relay2 IN |
| | + | |
| | + | |
| | + | '''Option 2: Energy Meter''' |
| | + | |
| | + | As a second function, a power meter can be installed. It sends for each consumed kWh depending on the model 1000 or 2000 pulses to the Raspberry.<br \> |
| | + | We can evaluate these pulses and calculate with the power consumption and the kWh price the power costs.<br \> |
| | + | The costs for a power meter are about 20,- US$ |
| | + | |
| | + | Raspberry Pin 5 (Gpio03) ---> power meter S0 +<br \> |
| | + | Raspberry pin 6 (ground) ---> power meter S0 - |
| | + | |
| | + | |
| | + | '''Option 3:. shot timer incl. shot administration''' |
| | + | |
| | + | A relay parallel with the magnetic valve provides us with the necessary contact. |
| | + | |
| | + | PINs: |
| | + | Raspberry Pin 3 (Gpio02) ---> RELAY5 closers<br \> |
| | + | Raspberry pin 6 (ground) ---> RELAY5 NO (PIN same as in option 2) |
| | + | |
| | + | |
| | + | '''Option 4: back flush automatic''' |
| | + | |
| | + | Raspberry Pin2 (+ 5V) ---> Relay3 VCC<br \> |
| | + | Raspberry Pin 14 (ground) ---> GND Relay3<br \> |
| | + | Raspberry Pin 18 (Gpio24) ---> Relay3 IN |
| | + | |
| | + | The NO contact of the relay goes to the control panel wires 2 and 7. |
| | + | |
| | + | |
| | + | '''Option 5: Boiler shutdown''' |
| | + | |
| | + | Raspberry Pin2 (+ 5V) ---> Relay4 VCC<br \> |
| | + | Raspberry Pin 14 (ground) ---> GND Relay4<br \> |
| | + | Raspberry Pin 22 (GPIO25) ---> Relay4 IN |
| | + | |
| | + | The NO contact of the relay goes to the control panel wires 2 and 9. |
| | + | |
| | + | |
| | + | '''10.''' For the cables we need a recess on the housing.<br \> |
| | + | I extended it directly besides the RCA connector and then pulled through the cable. |
| | + | |
| | + | [[File: VivaldiMyTimer_Gehaeuse1.jpg]] |
| | + | |
| | + | [[File: VivaldiMyTimer_Gehaeuse2.jpg]] |
| | + | |
| | + | |
| | + | '''11.''' The closed casing can be sealed with an electricians tape against any moisture.<br \> |
| | + | (Due to the many holes on the chassis that's more of an alibi work;)) |
| | + | |
| | + | [[File: VivaldiMyTimer_Gehaeuse3.jpg]] |
| | + | |
| | + | |
| | + | '''12.''' Connection of the relay board |
| | + | |
| | + | GPIO22 turns the machine on and off. |
| | + | |
| | + | The two cables from the adapter cable to the control unit come on the closer. |
| | + | |
| | + | GPIO23 switches the automatic load. |
| | + | |
| | + | The two extended cores of the green terminal come on the opener. |
| | + | |
| | + | The connection diagram can be seen in the photo below the wires. |
| | + | |
| | + | [[File: VivaldiMyTimer_Relais1.jpg]] |
| | + | |
| | + | Here is a photo of the not connected relays. |
| | + | |
| | + | Who renounces the option 1 (automatic shot detection) of course has only one relay. |
| | + | |
| | + | Anyone who uses three relays, is prepared for the coming option "automatic cleaning program". (Now implemented) |
| | + | |
| | + | [[File: VivaldiMyTimer_Relais2.jpg]] |
| | + | |
| | + | |
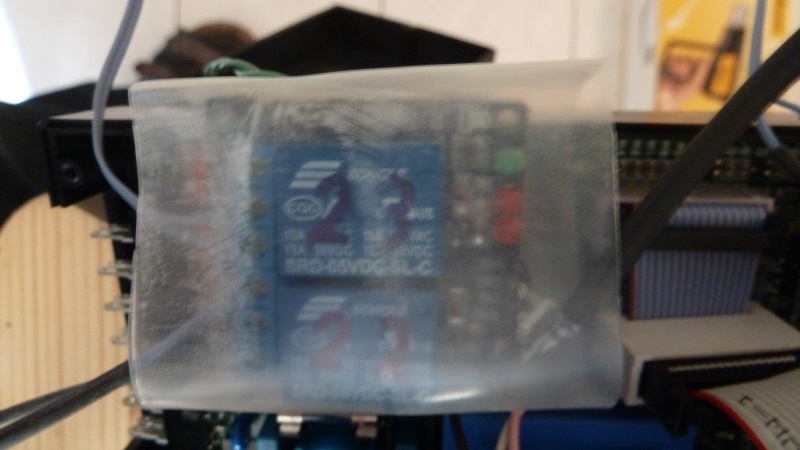
| | + | '''13.''' The completed attached relay should be protected against short circuits, as we put it into the casing of the control electronics.<br \> |
| | + | I have used a shrink tube. Wrap with electrical tape should also be OK. |
| | + | |
| | + | [[File: VivaldiMyTimer_Relais3.jpg]] |
| | + | |
| | + | |
| | + | '''14.''' Here is space for our relays.<br \> |
| | + | Now the housing of the control unit can be closed again. |
| | + | |
| | + | [[File: VivaldiMyTimer_Relais4.jpg]] |
| | + | |
| | + | |
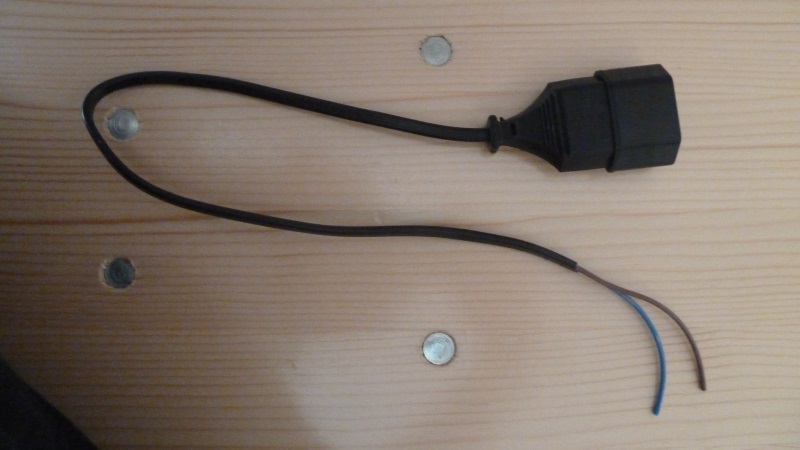
| | + | '''15.''' Now only the power plug for our Raspberry is missing.<br \> |
| | + | For this we cut out the extension and connect it to the power cord of Vivaldi. |
| | + | |
| | + | [[File: VivaldiMyTimer_Strom1.jpg]] |
| | + | |
| | + | |
| | + | '''16.''' Option 2: electricity meter (only if desired) |
| | + | |
| | + | Now the electrical meter can also be installed.<br \> |
| | + | Just pull the power cord of the Vivaldi into the machine until it reaches to the cup warmer. |
| | + | |
| | + | [[File: VivaldiMyTimer_Strom2.jpg]] |
| | + | |
| | + | |
| | + | Split the cable at the top and use the electricity meter. |
| | + | |
| | + | |
| | + | L is the brown wire direction outlet.<br \> |
| | + | N the blue wire towards outlet. |
| | + | |
| | + | The outputs are labeled accordingly. |
| | + | |
| | + | S0 + goes to Raspberry Pin5 (GPIO3).<br \> |
| | + | S0 + goes to Raspberry Pin6 (mass). |
| | + | |
| | + | If the electricity meter has a display, it need not to be visible, as we read the values on the Raspberry. |
| | + | |
| | + | [[File: VivaldiMyTimer_Stromzaehler.jpg]] |
| | + | |
| | + | |
| | + | '''17.''' Option 3: Shot timer (only if desired) |
| | + | |
| | + | We engage the shot timer from the relay for the magnetic valve. Because of the size and the need of a potential free contact, I have used a reed relay with built-in freewheeling diode. |
| | + | |
| | + | The solder points on which we can solder the relay we will see in the following image. !! Caution !! Unfortunately, the cores (+/-) are reversed on the photo. After correction I forgot to make a new image. |
| | + | |
| | + | [[File: Shottimer_Platine.JPG]] |
| | + | |
| | + | And here the used reed relays. This is also available at Reichelt (SIL No. 7271-D 12V). The label is: SA12-1A72-71D |
| | + | |
| | + | [[File: Shottimer_Reedrelais.JPG]] |
| | + | |
| | + | |
| | + | '''18.''' Now everything can be reassembled.<br \> |
| | + | The Raspberry I tucked in my top of the cup warmer.<br \> |
| | + | The SD card is facing up, so I can easily make a firmware update.<br \> |
| | + | With cable ties the power meter and the Raspberry can be fixed. |
| | + | |
| | + | [[File: VivaldiMyTimer_Einbauort.jpg]] |
| | + | |
| | + | |
| | + | '''19.''' Now we need the software. |
| | + | |
| | + | With the tool "Win32 Disk Imager" it is written to the SD card.<br \> |
| | + | Then plug it in the Raspberry and connect via cable to the network.<br \> |
| | + | |
| | + | Now power on the Vivaldi. |
| | + | |
| | + | After 2 minutes, the web interface should be reachable: http://Vivaldi/ |
| | + | |
| | + | The login is: viv<br \> |
| | + | Password: viv |
| | + | |
| | + | Now a test of the correct wiring of the relay can be done. |
| | + | |
| | + | |
| | + | '''20.''' In the "settings" menu, which is accessible through the gear icon at the bottom right, the system settings can be made. |
| | + | |
| | + | Here, the SSID and the WPA-Key of the WLAN network can be entered. Then the power plug must be disconnected shortly and the LAN cable are disconnected.<br \> |
| | + | Insert power plug. |
| | + | |
| | + | After 2 minutes, the web interface should be accessible via WLAN. |
| | + | |
| | + | '''Note:''' Probably only WPA2 works without problems. |
| | + | |
| | + | |
| | + | Possibly there are also some special characters in the WPA Key problems. |
| | + | |
| | + | If everything works you have done it and the housing can be closed. |
| | + | |
| | + | == '''Others''' == |
| | + | |
| | + | Switch on/off by web interface |
| | + | |
| | + | The Vivaldi can be switched directly over web interface.<br \> |
| | + | This can be used for various automation. eg FHEM / home automatisation |
| | + | |
| | + | Switching on: http://username:password@vivaldi/gpio_on.php<br \> |
| | + | Off: http://username:password@vivaldi/gpio_off.php |
| | + | |
| | + | == '''Time Zone''' == |
| | + | |
| | + | A hint for my non German users: You will have a timezone problem, Because the image is configured to German timezone. It is easy to change this via console: |
| | + | |
| | + | To change timezone, please use the program [http://the.earth.li/~sgtatham/putty/latest/x86/putty.exe Putty] to enter the shell of the raspberry. User: pi Password: Vivaldi |
| | + | |
| | + | Use "sudo Raspi-config" to change timezone. |
| | + | |
| | + | == '''printserver''' == |
| | + | |
| | + | You can configure the build in printserver with: http://vivaldi:631 |
| | + | It is possible to use any printer in same network as an airprint printer. |
| | + | There is no need for a wire connection between Vivaldi and printer. |
Information
Due to requests from english users, this page will become the english translation of the german documentation: https://www.kaffeewiki.de/index.php?title=Umr%C3%BCsten_der_La_Spaziale_S1_%28Mini%29_Vivaldi_II_auf_Timer,_Webinterface,_manuellen_Bezug_und_Stromz%C3%A4hler
As a start this will be the transpation via google translate. Everybody is invited to improve this page and do a better translation.
Installation of a timer "Vivaldi myTimer" in the Vivaldi incl. WLAN / WiFi
Aditionally the installation of further options will be described.
The following options are installed independent of the timer.
But it is mostly so little additional effort, so it is advisable to implement this, when the machine is opened.
Option 1: Switching automatic load / manual draft
option 2: energy meter
Option 3: Shot timer incl. shot administration
Option 4: automatic backflush
Option 5: boiler shutdown (not in mini Vivaldi)
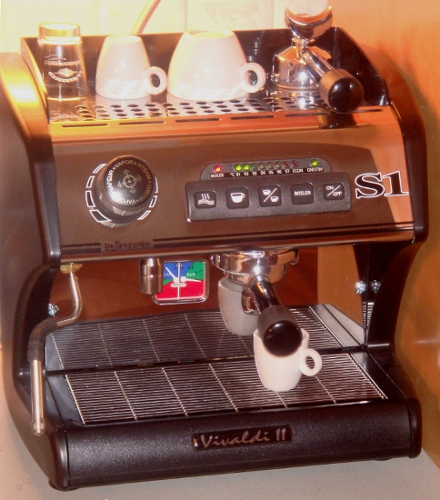
Project description
By installing a single-board computer (Raspberry Pi) into the Vivaldi a week clock timer with unlimited switching times will be realized.
As an additional feature the Vivaldi will get a wireless lan and can be switched on and off via PC/tablet and smartphone. In addition, the timer can be programmed web-based. By usage of relays keypresses to the power putton will be simulated by the Raspberry.
The material costs are about 65,- US$.
Functions
- Programming the (mini) Vivaldi wia web interfache
- Unlimited amount of timers to switch on/off the machine (daily, weekly, individually switchable) (with/without steam boiler in the non-mini)
- Switching on/off via web interface with popular browsers (eg with a smartphone when you are out)
- The non-Mini can be switched on with without steam boiler via the GUI optional
- Power on / off by building control via web Interface
- Automatic and manual shot Timer
- Shot administration (database with comment and favorites function) (Shots under 8 seconds will not be saved)
- The shot database can be cleaned by pressing a single button (all uncommented entries without favourite flag and without mark)
- all timers can be programmed individually with/without switching steam boiler shutdown (Not for mini Vivaldi)
- automatic shot can be switched off (manual draft)
- backflush automatic
- electric meter incl. electric cost calculator
- user management with authorisation concept
- configuration completely possible through the graphical interface
- phpMyAdmin can be used for data migration
- configuration of WLAN on Windows directly to the SD card possible
- integrated printserver with airprint
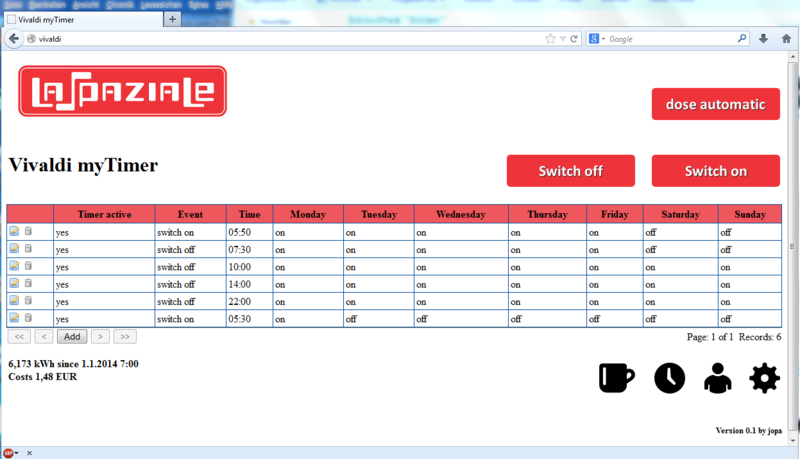
Screenshots
The web interface is available from PC / tablet or smartphone via web browser.
The timer includes manual on / off and change the automatic / manual dose.
shot timer / shot administrative

user management

configuration

Security note
The tasks described here may only be carried out by competent persons. When working on high voltage (120V/230V) can be deadly. Moreover, in case of errors the machine may be damaged.
Disclaimer
This description portrays the modification of my machine. There is no guarantee that errors have crept in. For this reason, do not accept all descriptions 1 : 1. It is intended primarily to be able to understand the work and to pay an own modification without this description. I am not responsible for any damage! This description is an initial draft. It would be glad if someone would check the description is correct. Suggestions, corrections and additional photos are welcome.
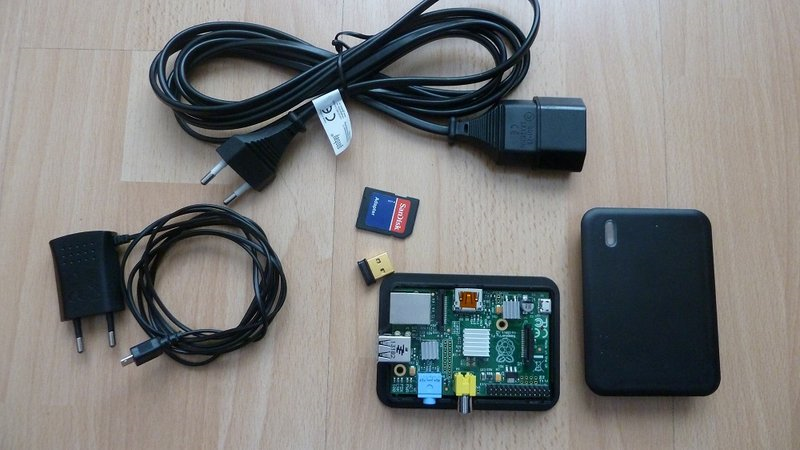
The material
The Raspberry PI (Rev. 2), a housing, a 4GB SD card, a WLAN stick, an AC adapter and an extension to realize a socket inside the Vivaldi for the power adapter. Who mounts the Raspberry externally, can also operate with a standard electrical outlet.
Note: The Raspberry PI (Rev. 2) is not 100% compatible with the Rev. 1. Due to the modified connector strip is not running the software provided correct.
Raspberry PI B + is pin-compatible and can therefore be used.
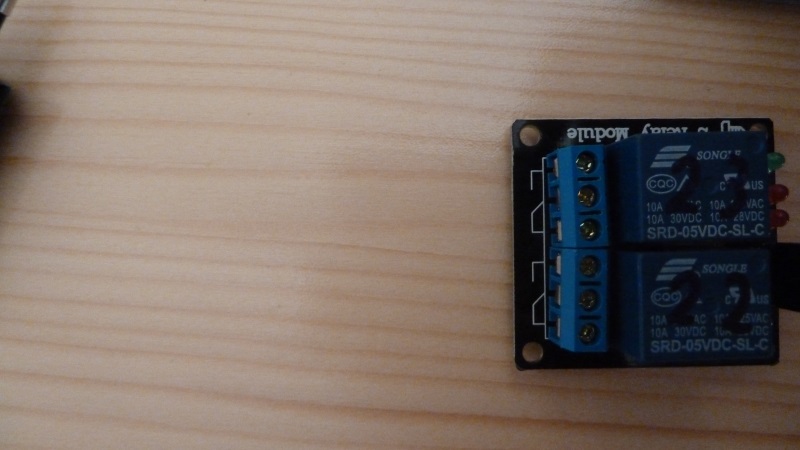
The cable and a relay.
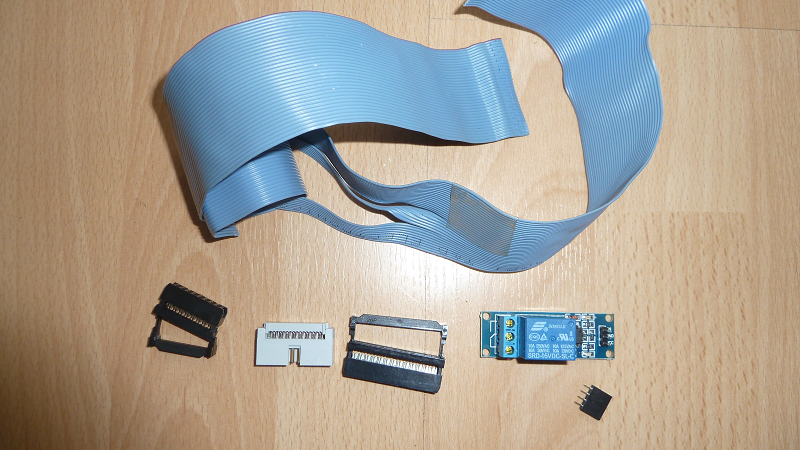
The components can be bougt at Reichelt: here the shopping chart
Then we need a the relay board with one or two relays. Here helps ebay search for "relays raspberry". Screws on both sides avoid soldering.
For option 2, a elecric meter is required. Ebay search for "electricity meter S0" will show some. There are models with different pulses per kW. The higher the value, the more accurate the count. 1000 pulses are but adequate.
The software
The software is available here (2-3GB): Download
The password for the image is: only4Testing
For this I need the user from KaffeNetz or from S1Cafe. In both of these forums I will support myTimer.
To other mail address I will not send messages.
German support is provided here: [1]
English support page is here: [2]
Here is an example of the surface through the browser of an iPhone:
Installation
In my Vivaldi I mounted the Raspberry inside the machine. For temperature reasons i can only recommend this if the boilers are isolated. For unisolated kettles I recommend to put the Raspberry onto the back of the Vivaldi. But if the machine is open anyway, an isolation with Armaflex is done also fast.
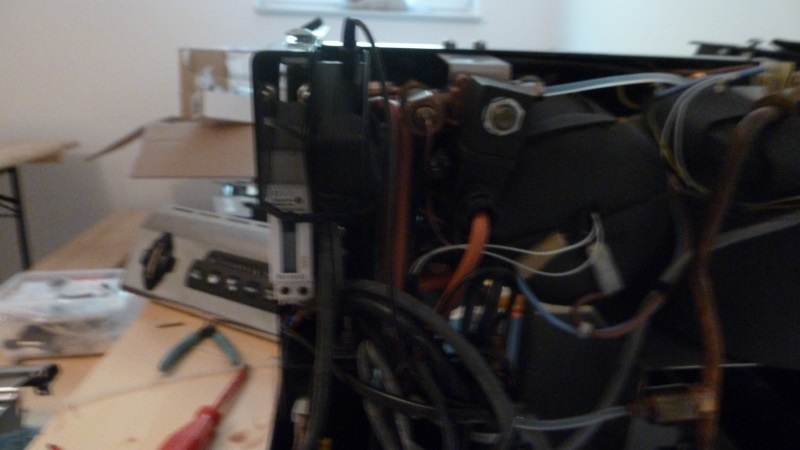
1. First, the machine must be opened:
2. Connect cable from the control panel to control electronics should be made free, so that the control electronics can be pulled to the rear:

3. The plugs should be labeled so that they will find the right place on the control electronics when mounting again.
4. Open the box of the control electronics:
5. With an adapter cable, we split the necessary pins out.
Important here is the direction of the markings.
The nose of the female connector and the recess of the plug strip facing upwards!
6. We need only the wire 1 (red) and 11 for the relay on / off.
For the "backflush" option we need the wires 2 and 7 (7 is the double shot, 2 and 5 (single shot) would also be OK).
For the "switch of steam boiler " option we need the wires 2 and 9.
All other wires will be removed.
The two wires we stuck in a shrink tube.

7. Insert adapter cable.

8. Option 1:
Preparing for automatic dose (only necessary if this function is desired)
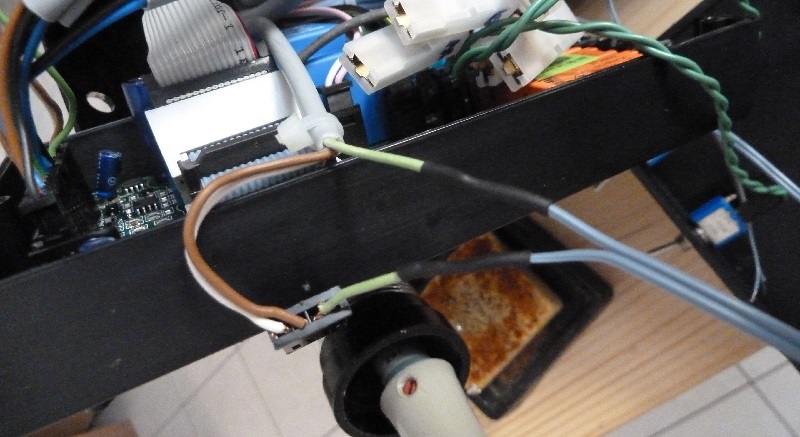
For this purpose, the plug next to the ribbon cable is severed and lengthened the green wire, so that it can be connected later on our relays:
9. Now the cable between relay and Raspberry is assembled.
I chose solder connections. But there are also relays available with screws. So no soldering would be necessary during the modification.
On the relay boards, the connections are usually labeled well.
On Raspberry we use the following pins:
For the timer
Raspberry Pin 2 (+ 5V) ---> VCC relay
Raspberry Pin 14 (ground) ---> relay GND
Raspberry Pin 15 (Gpio22) ---> relay
Option 1: Switching automatic shot / manual shot
This option is recommended. We only need another wire and a relay board with two relays. This costs only about 1,- US$ more than a board with only one relay.
Raspberry Pin 16 (Gpio23) ---> Relay2 IN
Option 2: Energy Meter
As a second function, a power meter can be installed. It sends for each consumed kWh depending on the model 1000 or 2000 pulses to the Raspberry.
We can evaluate these pulses and calculate with the power consumption and the kWh price the power costs.
The costs for a power meter are about 20,- US$
Raspberry Pin 5 (Gpio03) ---> power meter S0 +
Raspberry pin 6 (ground) ---> power meter S0 -
Option 3:. shot timer incl. shot administration
A relay parallel with the magnetic valve provides us with the necessary contact.
PINs:
Raspberry Pin 3 (Gpio02) ---> RELAY5 closers
Raspberry pin 6 (ground) ---> RELAY5 NO (PIN same as in option 2)
Option 4: back flush automatic
Raspberry Pin2 (+ 5V) ---> Relay3 VCC
Raspberry Pin 14 (ground) ---> GND Relay3
Raspberry Pin 18 (Gpio24) ---> Relay3 IN
The NO contact of the relay goes to the control panel wires 2 and 7.
Option 5: Boiler shutdown
Raspberry Pin2 (+ 5V) ---> Relay4 VCC
Raspberry Pin 14 (ground) ---> GND Relay4
Raspberry Pin 22 (GPIO25) ---> Relay4 IN
The NO contact of the relay goes to the control panel wires 2 and 9.
10. For the cables we need a recess on the housing.
I extended it directly besides the RCA connector and then pulled through the cable.

11. The closed casing can be sealed with an electricians tape against any moisture.
(Due to the many holes on the chassis that's more of an alibi work;))

12. Connection of the relay board
GPIO22 turns the machine on and off.
The two cables from the adapter cable to the control unit come on the closer.
GPIO23 switches the automatic load.
The two extended cores of the green terminal come on the opener.
The connection diagram can be seen in the photo below the wires.
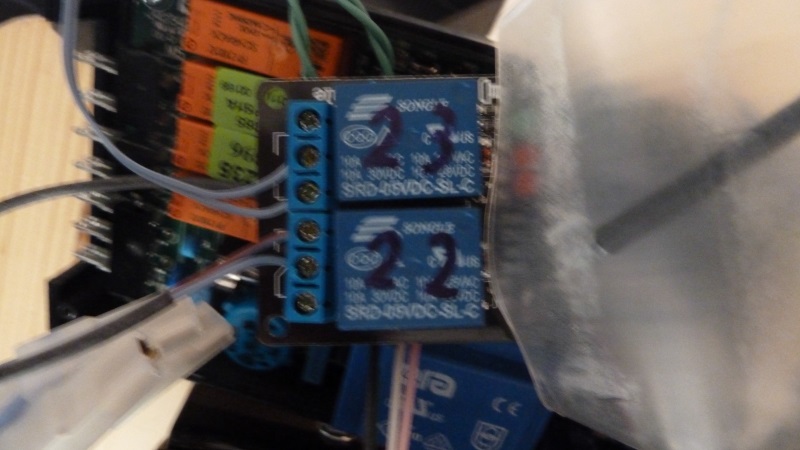
Here is a photo of the not connected relays.
Who renounces the option 1 (automatic shot detection) of course has only one relay.
Anyone who uses three relays, is prepared for the coming option "automatic cleaning program". (Now implemented)
13. The completed attached relay should be protected against short circuits, as we put it into the casing of the control electronics.
I have used a shrink tube. Wrap with electrical tape should also be OK.
14. Here is space for our relays.
Now the housing of the control unit can be closed again.
15. Now only the power plug for our Raspberry is missing.
For this we cut out the extension and connect it to the power cord of Vivaldi.
16. Option 2: electricity meter (only if desired)
Now the electrical meter can also be installed.
Just pull the power cord of the Vivaldi into the machine until it reaches to the cup warmer.
Split the cable at the top and use the electricity meter.
L is the brown wire direction outlet.
N the blue wire towards outlet.
The outputs are labeled accordingly.
S0 + goes to Raspberry Pin5 (GPIO3).
S0 + goes to Raspberry Pin6 (mass).
If the electricity meter has a display, it need not to be visible, as we read the values on the Raspberry.

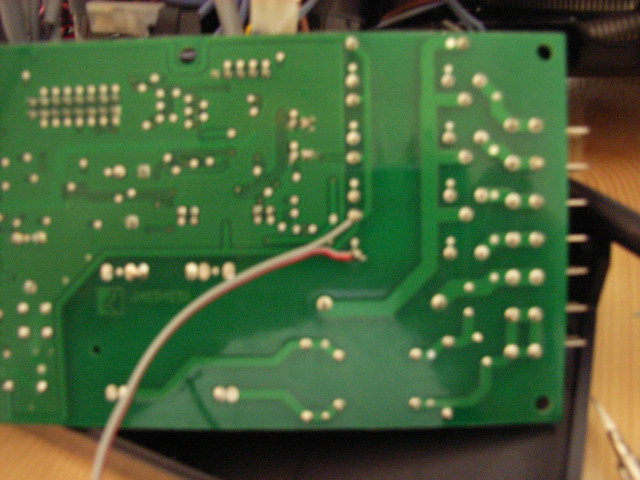
17. Option 3: Shot timer (only if desired)
We engage the shot timer from the relay for the magnetic valve. Because of the size and the need of a potential free contact, I have used a reed relay with built-in freewheeling diode.
The solder points on which we can solder the relay we will see in the following image. !! Caution !! Unfortunately, the cores (+/-) are reversed on the photo. After correction I forgot to make a new image.
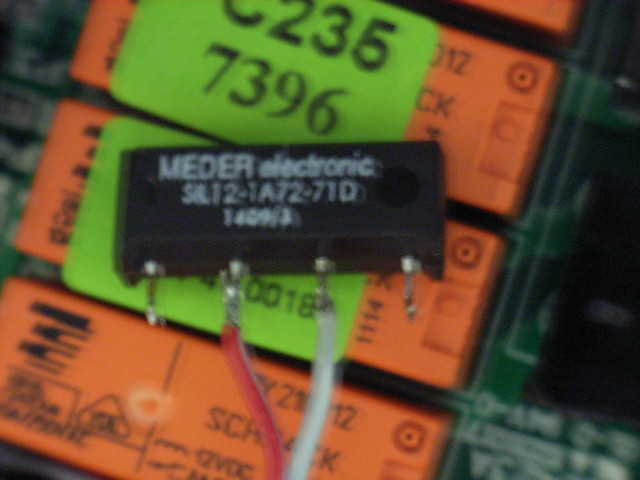
And here the used reed relays. This is also available at Reichelt (SIL No. 7271-D 12V). The label is: SA12-1A72-71D
18. Now everything can be reassembled.
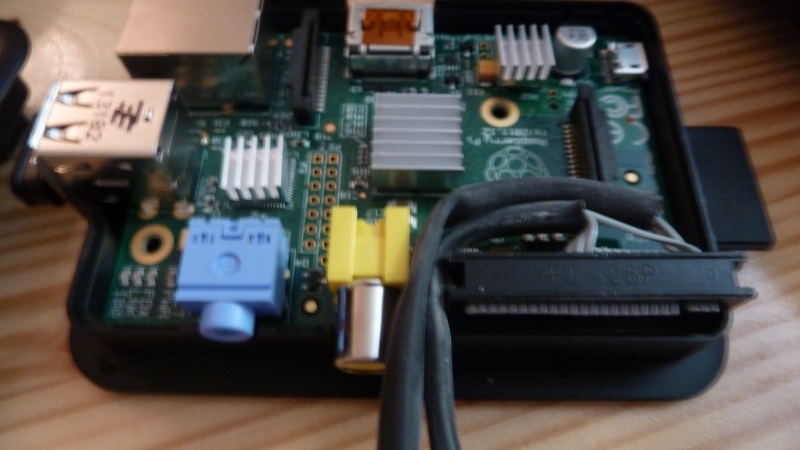
The Raspberry I tucked in my top of the cup warmer.
The SD card is facing up, so I can easily make a firmware update.
With cable ties the power meter and the Raspberry can be fixed.
19. Now we need the software.
With the tool "Win32 Disk Imager" it is written to the SD card.
Then plug it in the Raspberry and connect via cable to the network.
Now power on the Vivaldi.
After 2 minutes, the web interface should be reachable: http://Vivaldi/
The login is: viv
Password: viv
Now a test of the correct wiring of the relay can be done.
20. In the "settings" menu, which is accessible through the gear icon at the bottom right, the system settings can be made.
Here, the SSID and the WPA-Key of the WLAN network can be entered. Then the power plug must be disconnected shortly and the LAN cable are disconnected.
Insert power plug.
After 2 minutes, the web interface should be accessible via WLAN.
Note: Probably only WPA2 works without problems.
Possibly there are also some special characters in the WPA Key problems.
If everything works you have done it and the housing can be closed.
Others
Switch on/off by web interface
The Vivaldi can be switched directly over web interface.
This can be used for various automation. eg FHEM / home automatisation
Switching on: http://username:password@vivaldi/gpio_on.php
Off: http://username:password@vivaldi/gpio_off.php
Time Zone
A hint for my non German users: You will have a timezone problem, Because the image is configured to German timezone. It is easy to change this via console:
To change timezone, please use the program Putty to enter the shell of the raspberry. User: pi Password: Vivaldi
Use "sudo Raspi-config" to change timezone.
printserver
You can configure the build in printserver with: http://vivaldi:631
It is possible to use any printer in same network as an airprint printer.
There is no need for a wire connection between Vivaldi and printer.


